
Ways to integrate: API, SDKs, and no-code links
You don't need to write code to start verifying people with Didit - use a no-code link, or bring in an SDK or the API when you want automation.
Three routes. No-code links need no backend at all. The API plus a redirect is the standard integration. SDKs put the flow inside your own app - and are the only route that supports NFC. Whichever you pick, get results back with webhooks.
You don't need a developer to launch identity verification with Didit. There's a no-code option that takes minutes, plus API and SDK options for when you want it automated inside your own product.
#Can I use Didit without coding?
Yes. Once you've built a workflow in the console, you can generate a verification session two ways with zero code:
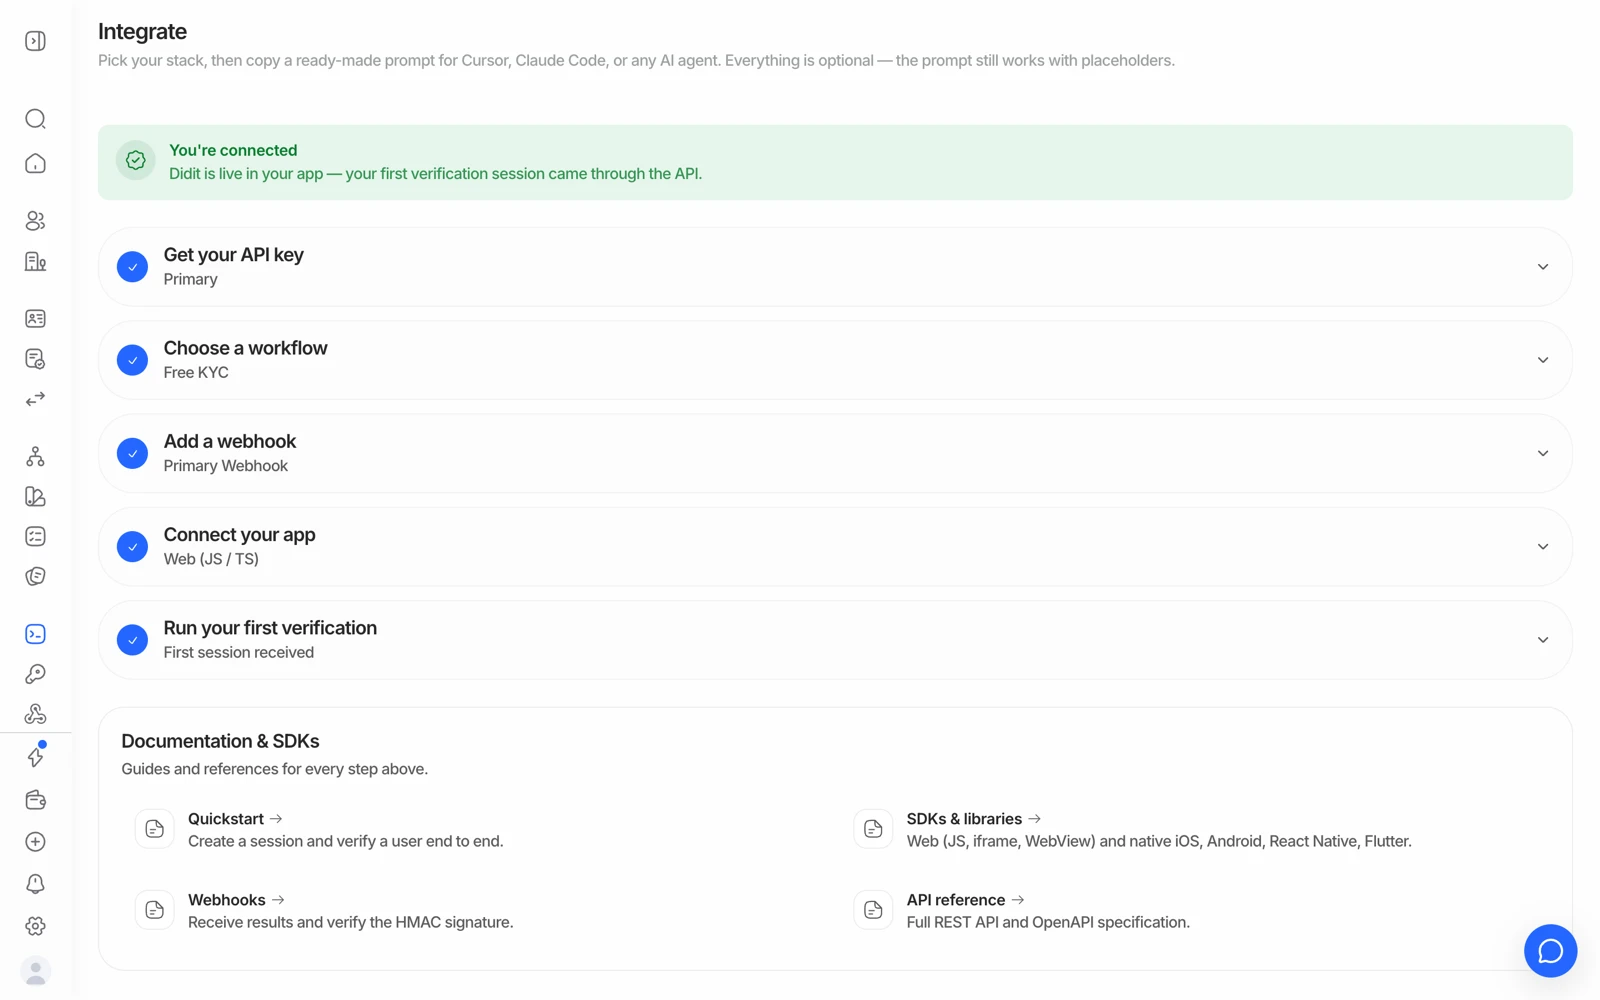
- Step one issues the API key your backend authenticates with.
- Step two picks the workflow each session will run.
- Step three registers where results are posted, and sends a test delivery.
- Step four is the code: copy the quickstart for your stack.
- Verification link (one-time)
From the Workflows page, create a session directly in the console. You get a unique URL and QR code for that person - send it by email, SMS, or any channel, or have them scan the code in person.
- Reusable link (Unilink)
Each workflow also has one reusable link that starts a fresh session on every visit. Put it behind a button on your site, print it as a QR code for a kiosk or branch, or share it with affiliates. See reusable links.
Both skip the API and your backend entirely - the right choice for MVPs, manual review, in-person verification, or getting started before you've built anything custom.
#When you want automation
If you need the result to update your own systems automatically - not just show up in the console - you'll want the API or an SDK:
| You want to... | Use |
|---|---|
| Redirect users to a hosted verification page from your app | A single API call to create a session, then redirect to the returned URL |
| Embed verification inside your web app | The JavaScript SDK or the in-context iframe |
| Verify inside a native iOS, Android, Flutter, or React Native app | The matching native SDK - required for NFC |
| Add verification to WordPress/WooCommerce or Shopify | The WordPress/WooCommerce or Shopify plugin - no code required |
| Wire it into an automation tool | The API from Zapier, n8n, or any tool that can make an HTTP request and receive a webhook |
| Get results pushed to your backend the moment they're ready | Webhooks |
| Run individual checks yourself (batch processing, custom capture UI) | The standalone APIs, called directly instead of through a workflow session |
#Sending the link yourself
If you create a session through the API, Didit returns the verification URL - and delivering it is then yours to do. Sending it from your own product, with your own copy and branding, is usually the better experience anyway: the person already trusts you, and a message from an unfamiliar sender is a conversion cost.
If you need Didit to email the person instead, pass contact details when creating the session. Confirm what's supported for your setup rather than assuming, and note that the email language is a separate field from the flow language. See setting the verification language.
#Choosing between hosted, embedded, and native
| Hosted redirect | Embedded (web SDK / iframe) | Native SDK | |
|---|---|---|---|
| Code required | Minimal | Moderate | Most |
| User leaves your app | Yes | No | No |
| NFC chip reading | No | No | Yes |
| Best camera behaviour | Good | Good | Best |
| Custom domain removes Didit from the URL | Yes | n/a | n/a |
If NFC matters to you, that row decides it: the chip can't be read from a browser page. See NFC chip verification.
Which embedded options are available on your plan is worth confirming with your Didit contact before you scope a project around one.
#Standalone APIs vs workflow sessions
A workflow session runs the checks together, produces one aggregate decision, and draws on the per-feature free allowances for the four free-tier features. A standalone API call runs one check on data you supply, returns just that result, and is billed per call with no free allowance.
Standalone calls are the right tool for batch processing, for a capture UI you built yourself, or for a check you want to run outside an onboarding flow. They're the wrong tool if you wanted the free tier.
#Testing before you go live
Create a separate application in sandbox mode for testing - each application has its own API key and workflows, so test traffic never touches live data, and sandbox sessions cost nothing while letting you force any outcome. See testing in sandbox.
#Next steps
- Set up a workflow first if you haven't: building a verification workflow
- Get results the moment they're ready: getting verification results with webhooks
- Where to find your API key: managing your API keys
- When something returns an error: API errors and what they mean